29 April 2012

Orange Raisin Muffins

I adapted this recipe from the Orange Date Muffin recipe from the The Joy of Baking website. I made a few changes to fit the ingredients I had at home. For example, instead of using 1 cup of whole wheat flour, I just added another cup of all purpose flour. (Though I do wish we had whole wheat flour on hand) I also used muscovado sugar instead of regular brown sugar and substituted buttermilk for a mixture of milk and vinegar.  Plus, I did not add any nuts. But the biggest change I made was using raisins instead of dates.

The result was amazing. My family polished off the muffins in record time. The best part was that the scent of oranges and freshly baked muffins just seemed to waft around the house. Super delicious. Next time, I plan on following the recipe exactly as it was written, but for now, I'm glad I made some substitutions.

Orange Raisin Muffins
2 cups all purpose flour
2/3 cup muscovado sugar (sifted)
2 teaspoons baking powder
1/2 teaspoon baking soda
1/2 teaspoon salt
1/2 teaspoon ground cinnamon
1 tablespoon orange zest
1/3 cup fresh orange juice
2/3 cup milk + 1 teaspoon vinegar
1 teaspoon vanilla extract
1 egg, beaten
4 tablespoon butter, melted
2/3 cup raisins

In a large bowl, combine flour, sugar, baking powder, baking soda, salt, cinnamon and orange zest. In another bowl, whisk together the milk and the vinegar mixture. Add the orange juice, vanilla extract, egg and melted butter to this and whisk until combined. Add the wet ingredients to the dry ones and stir until just combined. Fold in the raisins. Remember not to over mix. 

Pour the batter into 12 muffin cups. Bake in a preheated oven at 200C (400F) for 15-20 minutes or until a toothpick inserted into the muffins comes out clean. Serve warm, not hot.

30 March 2012

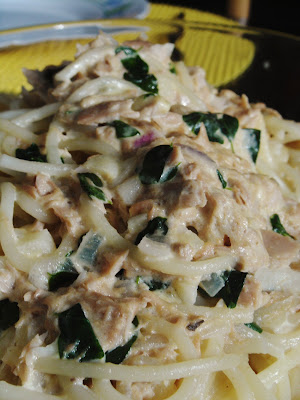
Tuna Pasta with Malunggay


A while back, I wrote about malunggayWhat I forgot to mention was that malunggay has such a neutral taste that you add it to almost anything. This is great when all you need if just some green to brighten your dish. This was exactly what I needed with my tuna pasta. It also one of the many ways one can add a bit more vegetable to your pasta.


Tuna Pasta with Malunggay
500g spaghetti, cooked according to package direction and drained
3 cloves of garlic, chopped
1 small red onion, chopped
1 180g can of tuna (in either vegetable oil or water), drained
1 cup heavy cream
50ml evaporated milk 
1 chicken bouillon cube (optional)
1/2 cup malunggay leaves
salt and pepper, to taste

In a saute pan, saute the garlic until golden brown then add the onion. Cook until the onion is translucent. Add the tuna and mix until the tuna has broken down into smaller pieces. Add the cream and the evaporated milk. You may add the bouillon cube at this point. If the sauce gets too thick, you may add some water. Add the malunggay leaves and bring to a gentle boil. Season with salt and pepper. Simmer for a few minutes before adding the pasta. Stir until the pasta is thoroughly coated with the sauce. Serve and enjoy.


29 March 2012

Mango Salsa

Mango Salsa. It's probably my favorite salad. Normally we'd only use green mangoes, but this time, though, we decided to add ripe mangoes to the mix as well. The result was a slightly sour salad with a dash of refreshingly sweet and juicy mangoes. It's a perfect side dish for many things, including creamy tuna pasta. But my ultimate favorite is when it is served with crispy fried milk fish and rice. 


Mango Salsa
1 unripe green mango, diced
1 ripe mango, cubed
1 small red onion, diced
1 tomato, diced
1 tablespoon sugar
salt, to taste

Place all the ingredients in a bowl and mix thoroughly. Allow it to sit in the refrigerator for at least 15 minutes before serving.


28 March 2012

Green Mango Smoothies


It's summer time again! Or at least it is in South East Asia, where there's only 2 seasons and 2 types of weather: rainy and sunny. Anyway, summertime always signaled the start of mango season. Mango is the ultimate summer fruit, and it's also the ingredient of my favorite summer cooler: Mango smoothie.

Now, there's several ways to go about it. You can use ripe mangoes, but I've always found that unripe green mangoes resulted in a far more refreshing drink. Maybe it's got something to do with it being sour. Anyway, I've got two versions of the Green Mango Smoothie. One is our regular smoothie and the other was an unexpected discovery.

Green Mango Smoothie (regular)
Ice (usually one ice tray)
Green Mangoes (2-3 mangoes are ideal, but 1 will also do)
1 cup water plus more if needed
Sugar to taste

Peel the green mangoes and cut it up into smaller pieces. Place ice in the blender. Pulse until the ice looks like shaved ice. Add the green mangoes and pulse until pureed. Add the water and the sugar. I usually add 2-3 tablespoons of sugar, depending on how sour the mangoes are. Pulse again until everything has a smoothie texture. Pour into glasses and serve.

The second recipe was discovered purely by accident. My mom had made green mango salsa a week ago. Green mango salsa is basically a mixture of diced green mangoes, onions and tomatoes with a little salt. Unfortunately my mom's green mango back then was really really sour. We could take a bit of it without making the funny sour face. When I told my mom that I'd like to try making green mango smoothies one day, she suddenly had the idea of turning our inedible sour salsa into a smoothie. Yes, we gave her our best reluctant look, but as it turned out, with a little sugar, it tasted quite fine. So, here's our recipe for it:

Green Mango Salsa Smoothie
Ice (one tray)
Green Mangoes (2-3 mangoes are ideal)
1 tomato, chopped
1 small red onion, chopped
1 cup water plus more
Sugar to taste

Peel and slice the green mangoes into small pieces. In a blender, add the ice and pulse until it becomes shaved ice. Add the green mangoes, tomato and onion. Blend until pureed. Add water (add more if needed) and the sugar (again, 2-3 tablespoons, depending on taste). Blend until smooth. Pour into glasses and serve.

My best tip for making green mango smoothies is to taste and taste again until you think it tastes great. Also, I understand some people prefer smoothies where you can still feel the bits and pieces of mangoes. Remember, it's all up to you how smooth you want it. Finally, you can use simple syrup instead of sugar, if you want. Enjoy!


21 February 2012

Pinakbet

Pinakbet is what I like to call as a “vegetarian dish in disguise”. The main attraction in pinakbet is the vegetables. The meat is almost an afterthought and the shrimp paste is added for a better kick. It’s quick and easy dish to make, making it perfect for the weekdays. I’ll admit that as a child it wasn’t my favorite dish, but with so many vegetables to choose from in this dish, I didn’t find hard to eat.

A note on the ingredients: I know there are several varieties of squash, especially in North America. If you can, try to use calabaza squash (known locally as kalabasa). On the other hand, bitter gourd (also known as bitter melon) is my least favorite vegetable. Why? Because it is extremely bitter. Technically it's a fruit but it's often used as a vegetable when cooking, like tomatoes and squash. In the Philippines, we call it ampalaya, a name that still send shivers down my spine. If cooked well though, it loses some of it's bitterness and can actually taste good. The shrimp paste also helps a lot.
Bitter gourd

That brings me to shrimp paste. Shrimp paste is found all over Southeast Asia. There are several different varieties. In the Philippines, it's call bagoong. If cooked, it goes quite well with unripe mangoes, balancing the mangoes' sour taste with its saltiness. It is made by fermenting ground up shrimp or tiny little shrimp.
Shrimp paste

A bottle of shrimp paste


Pinakbet
3 teaspoons vegetable oil (I used canola oil)
1 small onion, chopped
3 cloves of garlic, chopped
1 tomato, chopped
1/8 kg chicken breast, sliced into cubes
1/8 of squash sliced into cube (if your squash is smaller, use more)
1/4 cup water
1 eggplant, sliced diagonally
2 small bitter gourds, seeds removed and sliced thinly
4 okras, sliced diagonally
½ tablespoon shrimp paste
1 chicken bouillon cube (optional)
salt and pepper (to taste)

Heat a saute pan (or wok) over medium low heat. Add the oil. Once the oil is hot enough, saute the onion until it becomes translucent. Then add the garlic and cook until golden brown. Add the tomato. Cook until it is tender. Add the chicken breast, squash and bitter gourds. Add water as needed. Try not to add too much water. When the chicken looks cooked, add the egg plant and the okra. When all the vegetables are cooked and the squash is tender, add the shrimp paste and the bouillon cube. If it still requires some salt, add some at this stage, though based on my experience, it usually doesn't require salt any more. Serve with freshly cooked rice.


20 February 2012

Grilling


Grilling is one of my favorite methods of cooking. There always seems to be a ritual that accompanies it, especially when we don’t use the electric grill. One of the things that I love best about it is that the food is usually so good that it practically signals you to eat with your hands, the polite way, of course. Yes, there’s a polite way and a barbarian way of eating with your hands. It depends on which country you’re in, of course, but the general rule is not to stuff your face and not to play with your food. Another thing I love about grilling is that the food tastes really simple, at least most of the time. It’s usually not smothered in sauce and its natural flavors just seem more enhanced.
All the grilled things

The grilling process is pretty straight forward. I guess the hardest bit would be lighting the charcoal (if you’re using a charcoal grill). In the US, I’ve usually used charcoal that’s been pre-soaked in lighter fluid. When I told my mom about this, she gasped and said there was no way something so flammable would enter her house. And, they are quite combustible. Whenever I light one of these up I immediately feel like a little pyromaniac. The only thing I would add to this is that you should the charcoal burn a bit first before putting anything on the grill. If you don’t, your dish is going to taste like kerosene, and trust me, that does not taste good. In the Philippines, though, my family does it differently. The charcoals we use are not soaked in lighter fluid, so we usually hold one piece over the stove fire. Once a little flame has started on that piece, we add it to the pile of charcoal on the grill. Then the hard part begins. We have to fan the flame until most of the charcoal pieces have caught fire. On the plus side, your food won’t taste like kerosene. On the downside, your arm will feel like it’s falling off.
The trick to any great seafood dish is fresh fish. You can tell if the fish is fresh by looking at how clear its eyes are. Also, it shouldn't smell fishy. It should smell like the sea.

Here are some examples of what we love to grill. Fish is my mom’s absolute favorite. The fish here is locally called samaral. It’s a good grilling fish. You can grill all kinds of fish and even shellfish, but it’s important to remember that not all fish will taste their best when grilled. There are some fish that are just more appropriate for other uses. Oh, don’t forget to season your fish very well when grilling. Rub the salt all over the fish. If you’re cooking a large fish, don’t forget to do the insides too. Unseasoned fish tastes bleh…unless it was still alive 15 minutes before you placed it on the grill. Also, try not to turn your fish too often. You’ll know when one side is cooked if the fish’s skin does not stick to the grill. Do not force it to turnover or your fish will fall apart.
Don't forget to rub salt inside the cavity!


Grilled eggplant is another favorite. It’s easy to tell if it’s cook too. Basically, it’s cooked if it’s soft and its skin practically falls from it. If you’ve got the bigger and fatter variety, you may want to slice it thinly and then rub some extra virgin olive oil on it first. You may also want to season it. If you’re using the smaller ones, like these, all you need to do is throw it on the grill. My two favorite grilled eggplant dishes are Tortang Talong and Eggplant Salsa. You can access the tortang talong recipe here. Here's the recipe for Eggplant salsa:

Eggplant Salsa
1 (or 2) grilled eggplant, peeled and mashed, with the head removed
1 small red onion, diced
3 cloves of garlic, chopped
1 tomato, diced
3 tablespoons vinegar (preferably coconut vinegar, but any other type except balsamic vinegar would do)
salt and pepper to taste

In a bowl, combine the eggplant, onion, garlic and tomato. Add the vinegar and season to taste. Mix well, then serve.

Once the eggplant is cooked, its skin will peel away easily.

I honestly did not know you could grill bananas. It was my mom’s idea, and boy, was it a good one. You have to use saba bananas, of course, mostly because it’s the cooking banana. The banana formed a nice little crust once it was done, so there was a slightly crispy layer with a soft inside. The banana retained its natural sweetness. It may seem right to add sugar to it, but I wouldn’t suggest it. The banana was great by itself.
Grilling bananas

Forming a nice crust on the bananas

01 February 2012

Mangoes


Mangoes!!!! I love mangoes! I know there's many different types of mangoes, but my favorite by far are Philippine mangoes. So sweet and juicy. They usually come out during the summer months in the Philippines (meaning April, May and June). This year, though, the mangoes seem to have decided to make an early appearance. 


In the Philippines, there two commonly sold mangoes in the market: ripe mangoes and unripe mangoes. The third type sold in the market are called Indian mangoes and are generally eaten the same way an unripe Philippines mango is eaten. The biggest difference between these two mangoes is that Indian mangoes are smaller and can 
Ripe mango. Notice how beautifully yellow it is.

To eat the ripe Philippine mango, one need only to slice it correctly and scoop the flesh of the fruit out. Sounds easy? It certainly is! To find out where to slice, lay the fruit on a flat surface, like a table or a counter top. Your knife must be parallel to the side on which the mango lies. This means that your knife will be parallel to the flat side of the seed of the mango. Start with a small incision at the top of the mango, near where the mango would have been attached to a branch. Then gently slice down the mango. Don't worry and let the seed of the mango will be your guide. Repeat this step on the other side of the seed. You'll end up with something that looks like this: (The one of the left is the fleshy side and the one on the right is the seed)
Fleshy portion
Seed portion


Now, sometimes people want their mangoes to come in cubes, so they will make lengthwise and crosswise cuts on the fleshy portion of the mango. This way, you can simply invert the skin of the mango and little mango cubes will pop out. What about the mango seed? What should you do with it? Personally, I love sucking the flesh out of it. 


Unripe mango
Now, onto the unripe mango. The first step to eating it, is peeling it. Use a small paring knife or a vegetable peeler. Then, cut it the same way you would a ripe mango, so that you separate the fleshy from the seed. At this point, you can either cut the flesh into sticks, like crudites or dice it up for mango salsa. The important thing to remember about unripe mangoes is that they are very sour. So, if you plan on eating them like crudites, pair them some Filipino shrimp paste or bagoong. The saltiness of the bagoong will balance out the extreme tang of the mango. If bagoong is not for you (oh no!), you can pair your mangoes with an equal mixture of salt and sugar. Enjoy your mangoes!

Mango Salsa
1 unripe mango, peeled and diced
1 small red onion, diced
1 tomato, diced
1 teaspoon sugar (if needed)
salt to taste

In a bowl, mix the mango, onion and the tomato. If the mango is too sour, add the sugarSeason to taste and serve cold.