Showing posts with label Baking. Show all posts

25 January 2012

Of Failures

First attempt at orange muffins

Even the best of us can fail sometimes. In fact there's tons of scientific literature on human error and how to avoid it. Engineers design systems specifically to minimize these errors. Sometimes the solution is as simple as getting enough sleep, but sometimes it's as complicated as designing a new system. I guess it's the same thing in baking and cooking. There a loads of ways one can make mistakes in baking and cooking. And though I've never burnt the kitchen down, I've had my moments of failures. Here are two examples.

I've wanted for some time to make orange muffins and since we had the most beautiful supply of oranges this year, I thought it would be the perfect time to make them. My first recipe came from: The Domestic Goddess blog. From the very start, I thought it was weird that the recipe did not include any leavening agent like baking powder or even baking soda. Still, I desperately wanted to make these, so I followed the recipe, despite my doubts. My second mistake here was simply changing the lemons to oranges, without remembering that the oranges were very sweet on their own. The result was a sickly sweet muffin that felt more like rubber than a muffin.


My second attempt turned out better, but I still managed to make a mistake. The good part was, it's not really my own fault. Has anyone told you that sometimes you cannot trust your senses? Well that's definitely true here. When I made the second batch, I picked up a jar filled with what I thought was flour. Yes, looked, felt and smelled like flour, and in my head I thought ", It must be flour." How totally wrong I was. Once the muffins baked, they looked a lot better than my first attempt despite not having a muffin top. Unfortunately, they had an odd flour-like smell to them. I was about to chalk all these up to me using old flour, but when I told my mom about it, her face fell. It turns out I might have used rice flour instead. Since my mom's kitchen did not really have labels, I must have picked up the wrong jar. See what I mean about changing the system?


Anyway, I would still use this recipe from Pinch of Yum again. Hopefully the next time I make muffins, I'll actually have the right flour. The muffins actually taste good despite the floury smell.


Orange Muffin
1/3 cup milk
3 tablespoon vegetable oil (I used canola)
1 egg, beaten
2 tablespoons corn syrup
juice of 1 large orange (I used naval oranges)
1 cup flour
1/3 cup muscovado sugar
1 1/2 teaspoons baking powder
1/4 teaspoon salt

For glaze (optional, I opted out)
1 cup powdered or icing or confectioner's sugar
2 tablespoons orange juice

orange zest plus white sugar (1:2 ratio)

Start by preheating the oven to 350F or 180C. Whisk milk, oil, egg, corn syrup and orange juice together. Add flour, sugar, baking powder and salt. Stir until just combined. Pour into a prepared muffin pan and bake for 10-15minutes.

For the glaze, combine the powdered sugar and the orange juice. Drizzle this over the muffins and sprinkle a mixture of orange zest and white sugar on top.


Edit: I finally found out what sort of "flour" I added to the muffins. My dad says it's semolina. Trust me to mistake semolina for all purpose flour.

17 January 2012

Of Cocoa Brownie


My mom had always insisted that using cocoa was better for making brownies than my usual melted chocolate. When my mom insists on something, you follow. So I looked up a brownie recipe that used cocoa powder instead of chocolate. I found this recipe from Smitten Kitchen. I tweaked it a little by using muscovado sugar instead of white sugar and reducing the amount to one cup only instead of 1 1/4 cups. The result? A more adult and less sugary brownie. It still retained its fudginess, but its chocolate flavor seemed to intensify.


Cocoa Brownie
10 tablespoons butter
1 cup muscovado sugar
3/4 cup plus 2 tablespoons unsweetened cocoa powder
1/4 teaspoon salt
1 teaspoon vanilla extract
2 large eggs, cold
1/2 cup all purpose flour
2/3 cup nuts, like pecans or walnut or cashews (optional, I didn't put any)

Preheat the oven to 325F or 160C. In a heat-proof bowl, add the butter, sugar, cocoa powder and vanilla extract. Place the bowl over a pot of barely simmering water. Stir until the butter has melted and the mixture is hot enough such that you instinctively remove your finger after testing it (I thought that was a funny way of putting it, but yes, it's in the recipe). 

Remove from the heat and set aside to cool a bit. The mixture should be warm and not hot. Stir in the vanilla extract. Add the eggs one at a time, stirring vigorously after each addition. Once it's well-blended, shift in the flour. Stir until well-blended. At this point, you can add the nuts if you want. Stir again, if you do. 

Finally, pour the batter into a prepared 8x8 inch pan. Make sure to use parchment paper or foil as this will help in removing the brownies from the pan. Bake in the oven for 20-25 minutes. Once done, let the brownie cool completely before cutting. I suggest refrigerating for about an hour first before cutting. Finally cut into tiny squares and serve!


28 October 2011

Of Butterless Brownies


Have you ever wanted to bake or cook something and not have the ingredients for it? It has happened to me so many times that I've lost count. Today was one of those days. I wanted to bake something, but I didn't have butter, and that made baking difficult. Instead of simply going to the neighborhood store to get more butter, I decided that I should just get a recipe with no butter. That's were the trusty Googler came in. A quick search in Google yielded tons of butterless recipes. There was just one problem: most of them were also milkless and eggless, and that just sounded too sketchy for me. Egg substitute gives me the hibby gibbies. 


Lucky for me, I came upon this butterless brownie recipe. It called for extra virgin olive oil instead of butter and you used actual eggs too. It also had rolled oats, and in the original recipe, roasted almonds. I also didn't have those, so I simply left the almonds out and instead, replaced it with extra chocolate chips and a drizzle of Nutella. (I'm telling you, I adore that stuff) The result: perfect brownies with just one drawback: you'll have a hard time keeping away from these long enough for them to set well.

You will need:
100g melted chocolate (dark or in my case, semi-sweet)
1/3 cup Extra virgin olive oil
1/2 cup flour
1/4 cup rolled oats
1 tsp baking powder
1/4 sea salt
2 eggs at room temperature
2/3 granulated sugar
1 tsp vanilla extract
Chocolate chips (or nuts if you want)
Nutella, softened

First step is to preheat your oven to 175C or 347F. Then prepare your 8x8 baking pan by lining it with a lightly greased parchment paper. Whisk the melted chocolate with the olive oil in a bowl. In another bowl, mix together the flour, oats, baking powder and salt. In a larger bowl, beat the eggs and the sugar together until the mixture becomes pale and thickened. Fold in the dry ingredients, then the chocolate and oil mixture in too. Finally, add in the vanilla extract. Once everything has just come together, pour into your prepared pan. Sprinkle the top with extra chocolate chips and drizzle with Nutella. My best advice at this step is to go big. Don't scrimp (unlike me). Drizzle as much Nutella and chocolate chips and nuts as you want. Then place the pan in the oven and bake for 22-26 minutes or until the top is dry and a tooth pick comes out clean when you prick it.


PS. I adapted this recipe from:
http://www.passionateaboutbaking.com/2009/07/olive-oil-brownies-with-roasted-almonds-mmmmm-delicious.html
And yes, I loved these brownies. I watched them disappear before my eyes my my dad's coworker's kids gobbled them all up.

23 October 2011

Of Lemony Birthday Cakes


Oh Lemony goodness, I love you. Ever since I made lemon bars a few weeks ago, I've been thinking about making another lemony dessert. The perfect occasion came up: My birthday. I also found the perfect cake: Lemon Curd Cake. I got the recipe for this cake from BBC.


There are three parts to this cake: The cake, the curd and the icing. 

The cake:
The zest of one lemon
1 tablespoon lemon juice
1 1/2 cup self raising flour
1 teaspoon baking powder
170g butter
1 cup sugar
3 eggs

To make the cake, mix every thing together in a bowl until smooth and creamy. The divide the batter between two 8-inch pans and bake for about 35 minutes. Like any cake, it's always better to check if the center feel springy when touched. I actually baked mine for a little less than 35 minutes.


The curd:
While waiting for the cake, I decided to start on the curd. The instructions were easy enough to follow, but I still had one problem: I've never had lemon curd before. Which meant that I had no idea how thick was thick enough, and I had totally forgotten to watch videos to figure out how thick was thick enough. Thankfully, it still came out pretty well.

1 lemon, juice and zest
1/2 cup sugar
2 eggs
60g unsalted butter (Ok, the recipe actually says 2oz which is 56g, but I figured, what harm could 4g more do?)

Place lemon zest and sugar in a bowl. Whisk together the eggs and the lemon juice, and pour over the sugar and zest. Whisk everything together. Cut the butter into little pieces and add to the mixture. Place the bowl over a barely simmering pot of water. If you have a double boiler, you can use that. Stir frequently until thick. 

I was afraid that the curd would curdle on me, but it didn't and I was actually able to leave it on the stove for a few short minutes to check on other things. I think the key to this is just keeping an eye on it and whisking very frequently. I heard that it does curdle, you can simply take it off the heat and whisk until the lumps disappear, then just strain the curd when you're done.


The icing:
This is where I hit a little stumbling block. See, I had decided earlier that I didn't need to buy more confectioner's sugar, mostly because I had decided not to reduce the sugar in this recipe for my dad. Hey, it's my birthday after all. As a compromise, and also so I wouldn't have to keep thinking about his sugar levels, I decided not to make a lot of icing. The recipe calls for:

zest of one lemon
1/2 cup icing or confectioner's sugar
2-3 teaspoon lemon juice

Mix everything together until you get a soft runny consistency. Let it stand for about 5 minutes before using it. 

Since I didn't make enough icing, my cake ended up having a sugary glaze instead of the delicious white icing you see on the BBC website. Oh well. You can also decorate your cake with lemon slices. To add a touch of color, I added strawberries on top. 


14 October 2011

Of Lemon Bars


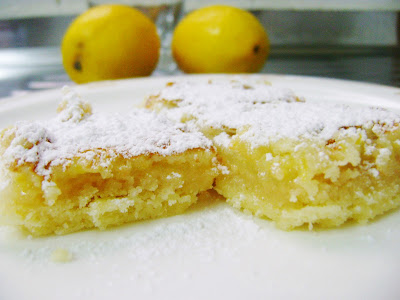
I've been thinking about making Lemon Bars for some time now. There's something about the sweetness and the tang of lemon that just makes lemon squares inviting. Not mention it's yellowness just exudes happiness. So, there was only one thing to do: hop on to the store, grab some lemons and start baking. The recipe I used was from the trusty joyofbaking website. Her recipes have yet to fail me. 

I started by making the crust, which consisted of:
1/2 cup of butter
1/4 cup icing or confectioner's sugar (although, I used even less because of the next few ingredients)
1 cup all purpose flour
1/8 teaspoon salt

I first beat the sugar and the butter until it became smooth and creamy before slowly adding in the flour and salt. Once all the ingredients just comes together, I placed it a prepared square pan (20cm x 20cm) and using my fingers, I pressed it into the bottom of the pan. Then I baked it in a 350F or 177C oven (I actually rounded it off to 180C) until it was light brown on the edges. That took approximately 18 to 20 minutes. Don't forget to remove it and cool it.

I started on the filling after the crust was was done and had cooled a little. This is where the magic happens.
1 cup granulated sugar (Yes, 1 cup. I had to resist decreasing it)
2 large eggs
the juice of 2 large lemons
1 tablespoon of lemon zest (I just used the zest of the 2 lemons)
2 tablespoons of flour

I beat the sugar and the eggs until the mixture was smooth. To tell, I dipped the tip of my (clean) finger into the mixture, and rubbed the mixture on my finger with my thumb. If there's still some graininess to it, keep beating. Once it's smooth, add the lemon juice and the zest. Beat until combined. Finally, fold in the flour. Pour the filling over the crust and bake it in the same 180C/350F oven for 17-20minutes or until the filling doesn't wiggle so much when you shake the pan. Let it cool before digging in. You can cut then sprinkle icing sugar over it, or sprinkle before cutting, or (and I think this is the best) just cut and eat!

Next time, I think next time I'll try decreasing the granulated sugar. I wonder if it will change the consistency of the filling...hmm...

The only other thing I can say about this recipe is that it is so delicious. My pictures don't do it justice at all. The crust is nice and flaky. The filling is sweet and tangy, yet the crust is able to pull back the sweetness of the filling so you don't feel like you're eating a candy. So good. Try it!


12 October 2011

Of Banana Bread Scones


I love how soft the scone is.
I came about the next scone recipe because I was looking for another way to make scones. If you're on a diet and are watching the fat and sugar content of your food, this is the recipe for you. It's also great for those annoying overripe bananas. Yes, I find them annoying. It's called Banana Bread Scone and I found it on thekitchn.

This recipe isn't like any scone recipe I've come across before. First, the dough is quite wet. Second, part of the recipe required you to freeze the dough for about thirty minutes. That said, it smelled so good and it had the right amount of sugar in it. After cutting it, I realized that it was literally a cross between a scone and a banana bread. It was soft, but it wasn't as gooey and wet as a banana bread.

2 very ripe bananas (The ones I used were so ripe, they were practically falling apart when I peeled them)
3 tablespoons milk (the recipe said 2-4 tablespoons until it made 1 cup, but my bananas were so soggy, I had to forego the measuring part and just dumped them in a bowl with the milk)
1/2 cup plain cream (or yogurt)
2 1/2 cup all purpose flour
4 tablespoons granulated sugar
2 teaspoons baking powder
1/2 teaspoon salt
1 teaspoon cinnamon powder
4 tablespoons unsalted butter
1/2 cup walnuts (optional)

I mashed the bananas and added the milk in a bowl. Then I stirred in the cream. 
In a larger bowl, I combined the flour, sugar, baking powder, salt and cinnamon. I cut in the butter until I had a coarse crumb mixture. If you're using walnuts, this would be the time to incorporate them. 
Since I wasn't using them, I went on to the next step, which was pouring in the banana-cream mixture. I stirred until the flour was just incorporated. Then I lined a plate with parchment paper and poured my dough over it, shaping it into a disk. I covered it with another sheet of parchment paper and placed it in the freezer for 30 minutes.
I preheated the oven to 400F or 200C. Then I removed the dough from the freezer and removed the first parchment paper. I inverted it into a parchment lined baking sheet and removed the second parchment paper. 
At this point, you can lice them into wedges (pull them apart a bit you plan to do so to give them room to expand) or bake it as is and slice it later. I chose to do the latter since our freezer wasn't able to harden the dough by much. Then I baked it for 25-30 minutes or until the edges had turned golden brown.
After mine came out of the oven, I cooled it for a bit before slicing it into triangles. 

In the recipe for thekitchn, they used a glaze to decorate the scone. Since I was cooking for my parents (who are starting to get old people problems), I decided to forego this part and just serve it plain with some fruit

The banana bread scone as it came out of the oven


Cutting more slices


11 October 2011

Of Earl Grey Scones

Look at how gorgeous that brown scone is!
Lately, my interest in scones was piqued again. Now I know I've already blogged about scones (here), but humor me here. These two recipes will blow your mind. I've always made scones with either one of two recipes: the one I found on allrecipes and the one I found on joyofbaking. To make them more interesting, I would just change up the add-ons (for example using chocolate chips of caramel chips instead of currant etc.) Then I found some lavender in the herb section of a gourmet grocery store. All I knew about Lavender was that it was used in aromatherapy. Naturally I was curious about how to use lavender in food. That's when I read about Lavender scones, and that led me to looking for a scone recipe that played with our sense of smell.

I love how the egg wash just gives it that beautiful sheen
So, here's the first of two recipes:

Earl Grey Scones
2 tea bags of Earl Grey tea (Or 3-4 teaspoons of Earl Grey tea if you're using loose leaf tea)
1/2 cup milk
2 cups all purpose flour
1/4 cup granulated sugar
2 teaspoon baking powder
1/4 teaspoon salt
1/3 cup unsalted butter, cut into small pieces
1/2 cup currants
2 eggs
3 tablespoon milk

The first thing you should do is is heat the milk to almost boiling and allow the tea to steep in the milk. Allow it milk-tea mixture to cool before using. Before using the currants, soak them for a few minutes and completely drain them before use
Then in a large bowl, combine the flour, sugar, baking powder and salt. Add the butter and using your fingers or a pastry blender, blend until the mixture reminds you of coarse crumbs. Stir in the currants. Set aside.
Strain the tea and milk mixture (or remove the teabags) into another bowl and add one egg. Whisk together until combined and pour it into the dry ingredients. Using a fork, stir until all the flour is just wet. Be sure not to over mix.
Place the dough on a lightly floured surface a knead lightly (no more than 5 times), then shape into a ball. Pat the top until it is slightly flat, then cut into 8 triangles. Make an egg wash with the last egg and the 3 tablespoons of milk. Brush each triangle and bake for 15-18 minutes or until brown and a tooth pick comes out clean in a 190C or 375F oven.


11 September 2011

Of Brownies

Look how moist that brownie is, yet it has that nice crispy top.
I've been thing of brownies for a while now. I've put off baking them mostly because I ran out of eggs. Sad, but true. When I finally got eggs, I started looking for the perfect brownie recipe. One that was not too gooey and not too dry. Then I came across this recipe from the joyofbaking.com. It's called Katherin Hepburn's Brownies, because according to the author, Katherin Hepburn gave this recipe to a gossip columnist who published it in her column. Not sure if this is true or not, but I am extremely glad someone decided to publish this recipe. It's easy and everything is done in one bowl. 

2 ounces (60 grams) unsweetened chocolate, coarsely chopped
1/2 cup (113 grams) unsalted butter, cut into pieces
1 cup (200 grams) granulated white sugar
2 eggs
1/2 teaspoon vanilla extract
1/4 cup (30 grams) all purpose flour
1/4 teaspoon salt
1 cup (100 grams) chopped walnuts or pecans (optional)


Preheat the oven to 165C or 325F. Melt the chocolate and the butter in a large bowl over simmering water. Once melted, remove from heat and stir in sugar. Add vanilla and eggs. Stir, then add flour and salt. Add nuts too if you're using them.
Pour into a greased pan and bake for 30-35minutes or until a toothpick comes out clean. Cool and enjoy the beautiful scent this brownie has. Don't forget to cut into squares and serve.


The one change I made was the chocolate. Instead of using 60g of chopped unsweetened chocolate, I used half a cup of semi-sweet chocolate chips. I'm not sure if that's equivalent to 60g of chocolate, but the brownies still turned out great. I also reduced the sugar to 1/2 cup. I couldn't bring myself to use a whole cup of sugar. I also did not use any nuts for now. 


See the crumbs!! Fishy loves!

10 September 2011

Of Scones

I love scones. The recipe for scones is usually simple enough that when I was a kid, I really really wanted to bake them. There was just one problem. I didn't quite know what they were and how they should turn out. But, it was a good start for a ten-year old starting baker. It wasn't until college (and with the help of Google) that I really started baking them. I also started experimenting with the recipe. The first successful recipe I followed is from Allrecipes.com. It was (and still is) a 5-star recipe, and that's basically why I chose to use it.

Here it is below:

 2 cups all purpose flour
1/3 cup sugar
1 tsp baking powder
1/4 tsp baking soda
1/2 tsp salt
 8 tbsp or 1/2 cup butter (cold)
1/2 cup raisins
1/2 sour cream
1 large egg

1. Preheat oven to 400F or 200C. (I know it 400F is actually 204. 44C, but trust me, it won't matter)
2. Shift flour, baking powder and baking soda into a bowl. Add sugar and salt. Mix.
3. Cut butter into smaller pieces and add to flour mixture.
4. Using your fingers, work butter into the flour mixture until you get the consistency of cornmeal.
5. Add raisins and mix.
6. In a different bowl, whisk together sour cream and egg. Pour this into the dry mixture and whisk with a fork until everything is just moist.
7. Place this mixture onto a floured surface and form a ball.
8. At this point you may sprinkle an additional 1 tablespoon sugar or brush with either an egg wash or milk. Then using a lightly floured knife divide the ball into 8 pieces. Place on a greased or lined cookie sheet.
9. Bake for 15-17 minutes until golden.

Chocolate chip scones served with milk. The Florida's Natural is just there because it's grapefruit flavour, which I never got when I was in Florida.


That's the basic recipe. Here's what else you can do with this recipe:

a) Instead of using sour cream, you can use unflavoured yoghurt. I've tried this once when my family was in Doha, Qatar and for some reason I couldn't find sour cream. It works quite well. The texture is pretty much the same.
b) You can also add a little orange zest or lemon zest. It won't affect the flavour, but it does make it smell so good.
c) Substitute raisins with chocolate chips, nuts, other dried fruits or fresh blueberries. Basically anything that's about the size of a raisin and is edible.
d) You can also use a cookie cutter to form the scones if you want. 
e) Another recipe I used is from the website joyofbaking.com. This recipe uses only 1/4 cup sugar, only 1/3 cup butter and 1/2 cup milk or half-and-half or heavy cream instead of sour cream. It also asks for some vanilla extract. It's still a very good recipe. Note, though, if you do decide to use heavy cream, be prepared for the richness of flavour that you'll get. Very rich, but oh so delicious. (http://www.joyofbaking.com/scones.html)
f) On the same website, there is also a recipe for jam-filled scones where you divide the dough into 2, forming each into a circular disc. Then spreading jam on one disc and topping it off with the other before cutting and baking. (http://www.joyofbaking.com/SconesfilledwitheJam.html)


The possibility is almost endless with scones and it's quite hard to go wrong them. It's a perfect recipe for those who are just starting out.

Note: Scones are usually served with Devonshire cream and jam. I never actually tried it with either, but if you're planning an English tea party, these two might make it a bit more authentic. 

Isn't the little fishy cute?