31 October 2011

Of Mini Cheesecakes

Two ways of enjoying your mini blueberry cheesecakes

Oh my god! What could be more luxurious and sensuous than a cheesecake? Here's an interesting trivia about cheesecake: in Roman times, there was a type of cheesecake known as (I bet you won't guess it) placenta. Yes, that's right when the ancient Roman said they were eating placenta, they were actually eating cheesecake. It was basically a flour dough topped with cheese and honey, and it's definitely weird that such a thing could be associated with something so...gross.
Mini cheesecake with blueberry preserve topping

But that isn't what this post is about. Let's get back to what we know and love as cheesecake. There are many different ways to make cheesecake. You can either bake it or not bake it; have sour cream and eggs or no sour cream and eggs. Some are made with cottage cheese, others with other types of European cheeses. Some are flavored with chocolate, other with fruit, and there are an endless array of toppings.

The one type that I had yet to encounter was the mini cheesecake, which is essentially a cheesecake cupcake.  Now, what could be better than that? After seeing a picture of a mini cheesecake on Martha Stewart.com, I could not stop thinking about those mini cheesecakes. A quick search on the internet yielded exactly what I needed. I was delightfully surprised at how easy they were to make. It's almost too easy.

To make this cheesecake, I actually used a combination of three mini cheesecake recipes. The great thing about it is that I didn't need a springform pan or a water bath. All I needed were 18 muffin cups.


Mini blueberry cheesecake with swirls


For the crust
125g graham cracker (or digestive biscuits) crumbs
55g butter, melted
1 tablespoon sugar
1/4 teaspoon cinnamon powder
1/4 teaspoon ground nutmeg

For the filling
1lb (16oz or 454g) cream cheese (I used Philadelphia), at room temperature
1/2 cup sugar
1/8 teaspoon salt
2 eggs, at room temperature
1 teaspoon vanilla extract

1 teaspoon lemon zest 
1/2 cup sour cream

Other things needed
1 can blueberry filling or blueberry preserve
18 muffin cups and your muffin pans

Preheat the oven to 300F or 149C. Line the muffin pans with the muffin cups. Combine the graham cracker crumbs, butter, sugar, cinnamon and nutmeg. Press these to the bottom of each muffin cup. Bake for five minutes and store in the fridge while you make the filling. 

In a large bowl, beat the cream cheese until smooth and creamy. Add the sugar and salt. Beat until combined. Then, add the eggs one at a time. Finally, add the vanilla, lemon zest and the sour cream. Do not over mix. Remove the crust from the fridge and using a spoon, divide the filling among the muffin cups. To make swirls, dot a cupcake with the syrup part of the blueberry filling/preserve and swirl with a toothpick or a small knife. You don't have to do this if you'd prefer the filling to be on top. (In this case, don't put anything on the cheesecake) Bake the cheesecakes in a 300F or 149C oven for 20 minutes. Once you remove them from the oven, cool them on a wire rack then place them in the fridge for at least 4 hours.


Remember, this is a cheesecake, and that means, you can't eat it right away. This is where your EQ will have to kick into place. Once you're ready to serve, top with the blueberry preserves or whatever topping you'd prefer.  


28 October 2011

Of Butterless Brownies


Have you ever wanted to bake or cook something and not have the ingredients for it? It has happened to me so many times that I've lost count. Today was one of those days. I wanted to bake something, but I didn't have butter, and that made baking difficult. Instead of simply going to the neighborhood store to get more butter, I decided that I should just get a recipe with no butter. That's were the trusty Googler came in. A quick search in Google yielded tons of butterless recipes. There was just one problem: most of them were also milkless and eggless, and that just sounded too sketchy for me. Egg substitute gives me the hibby gibbies. 


Lucky for me, I came upon this butterless brownie recipe. It called for extra virgin olive oil instead of butter and you used actual eggs too. It also had rolled oats, and in the original recipe, roasted almonds. I also didn't have those, so I simply left the almonds out and instead, replaced it with extra chocolate chips and a drizzle of Nutella. (I'm telling you, I adore that stuff) The result: perfect brownies with just one drawback: you'll have a hard time keeping away from these long enough for them to set well.

You will need:
100g melted chocolate (dark or in my case, semi-sweet)
1/3 cup Extra virgin olive oil
1/2 cup flour
1/4 cup rolled oats
1 tsp baking powder
1/4 sea salt
2 eggs at room temperature
2/3 granulated sugar
1 tsp vanilla extract
Chocolate chips (or nuts if you want)
Nutella, softened

First step is to preheat your oven to 175C or 347F. Then prepare your 8x8 baking pan by lining it with a lightly greased parchment paper. Whisk the melted chocolate with the olive oil in a bowl. In another bowl, mix together the flour, oats, baking powder and salt. In a larger bowl, beat the eggs and the sugar together until the mixture becomes pale and thickened. Fold in the dry ingredients, then the chocolate and oil mixture in too. Finally, add in the vanilla extract. Once everything has just come together, pour into your prepared pan. Sprinkle the top with extra chocolate chips and drizzle with Nutella. My best advice at this step is to go big. Don't scrimp (unlike me). Drizzle as much Nutella and chocolate chips and nuts as you want. Then place the pan in the oven and bake for 22-26 minutes or until the top is dry and a tooth pick comes out clean when you prick it.


PS. I adapted this recipe from:
http://www.passionateaboutbaking.com/2009/07/olive-oil-brownies-with-roasted-almonds-mmmmm-delicious.html
And yes, I loved these brownies. I watched them disappear before my eyes my my dad's coworker's kids gobbled them all up.

25 October 2011

Of Arroz Caldo for Adults

Arroz caldo is basically the Philippines' version of porridge, except better. It's made from rice, water, chicken, garlic, onions and ginger. When I was younger, my mom would make this for breakfast using leftover cooked rice from the night before. She would usually cook more rice for dinner than usual if she planned to make arroz caldo for breakfast. She'd also cook the chicken, although she sometimes did this on the day itself. It is definitely one of the comfort dishes of my childhood.

This time around, though, I decided to make a more adult version by adding saffron. (I only say it's adult version because I figured that saffron is probably more expensive than safflower) It's probably not the best idea, but I did it anyway because the recipe I looked up used safflower, which I hear is an alternative to saffron. Since we had saffron and not safflower, I figured it would do. 

Another mistake I made this time was to use raw rice instead of cooked rice. This added to my cooking time.  It also taught me to just use my mom's recipes next time around. Most traditional recipes use raw rice, but the my mom's version is also a way for me to get rid of rice leftovers. So, instead of giving you my carefully measured recipe, I'll give you my mom's recipe instead. A word of warning, since this is my mom's recipe, I have to warn you that all the measurements she used are based on instinct. That's also how I basically learned to cook this dish until this disastrous effort of using someone else's recipe.

My Mom's Arroz Caldo Recipe
chicken cut into pieces (amount will depend on how much chicken you want)
3-4 cloves garlic, crushed and diced
1 small red onion, diced
1 scallion, separate white stalks from green leaves and cut into tiny pieces
1 small ginger, crushed and diced
oil
cooked rice (amount will depend on how much you are eating)
water (amount will depend on the amount of rice)
chicken bouillon cube (optional)
a big  pinch of safflower
salt and pepper
a calamansi (calamondin) per person
toasted garlic
hard boiled egg

The first thing to do is to decide how much rice you want to cook. You'll need a ratio of about 2 cups water for every cup of rice. Once you've decided, boil the chicken in a pot of water with half the ginger. Season the chicken with salt and pepper. Once cook, remove from the pot, but reserve the chicken broth. 
In another pot, saute the garlic until golden brown. Add the onion, the whites of the scallions and the rest of the ginger. Cook until the onions are a little translucent. Add the rice, the water and the chicken broth. Also add the bouillon cube if you're using it. Add the chicken. Cook on medium low heat until the water has thicken. The rice should have soften but not quite lost its shape. At this point, if the porridge is too watery, just allow it to boil off the water until it thickens again. If it is too dry, add more water. Add the safflower. Season with salt and lots of pepper. Serve in a bowl.


Traditionally, you can serve arroz caldo with calamansi, green scallions, toasted garlic and hard boiled egg, but my mom loves it without any of these toppings. Except for the calamansi, I like it the way my mom does too. Calamansi is the traditional citrus served, but you can also use 1/8 of a lemon or lime. I think if you don't add the safflower/saffron you end up getting Lugaw, which is another version of rice porridge. Truth is, you don't really need to add any of these because the joy in arroz caldo is simplicity of the dish, but it does add to the traditional yellowish color of the dish.


Of Nutella Hot Chocolates and Toastie Sandwiches


I had a craving for hot chocolate today. My usual hot chocolate recipe was to take a packet of Swiss Miss and pour it into a mug of hot milk. My dad on the other hand makes it the Filipino way, which is to dissolve a tablea (chocolate tablets made from roasted cacao beans and sugar) or two in milk. His version is really too rich for me, but it is still so good.  That led me to my search for the perfect homemade hot chocolate. Last night, I found a totally different recipe for hot chocolate. I got the idea from Big City, Little Kitchen.


This recipe is called Nutella Hot Chocolate, and you can see what attracted me to it: Nutella. I adore Nutella. This hazelnut chocolate spread was first made in Italy by Piertro Ferrero during WWII when cocoa was in short supply. It is almost the perfect dessert condiment. I especially love it on crackers and just a plain slice of bread. And I thought what's better than Nutella on hot chocolate.

To make this hot chocolate you will need:
1 cup milk
3 tablespoons Nutella
1 teaspoon cocoa powder
1/4 teaspoon cinnamon powder (the original recipe asks for cinnamon sticks, which may be better)
marshmallows (optional)
espresso powder (optional)

In a saucepan, combine the milk, Nutella, cocoa powder and cinnamon powder. (Add the espresso powder too if using) Place over medium heat, and whisk until the mixture simmers. Pour into your favorite mug and garnish with as much marshmallows as you like. I preferred it without marshmallows though. Enjoy!


The best sandwich to go with this hot chocolate is what I call a toastie sandwich. I actually made up that name a few days ago. I've actually had this type of sandwich a million times before, but I never knew what to call it. It wasn't until a few days ago that I decided to look up the actual name on Wikipedia. According to Wiki, it's called a toaster sandwich or a toastie in Britain or a jaffie in Australia or even a Breville. I love how I can just place a spread between two slices of bread and put it in a sandwich toaster. My two absolute favorite fillings are gouda cheese in one and blueberry jam in another.  If you don't have a sandwich toaster, you can use a panini maker or even just a toaster oven. Try it!
Toastie Sandwiches and Nutella Hot Chocolate


23 October 2011

Of Lemony Birthday Cakes


Oh Lemony goodness, I love you. Ever since I made lemon bars a few weeks ago, I've been thinking about making another lemony dessert. The perfect occasion came up: My birthday. I also found the perfect cake: Lemon Curd Cake. I got the recipe for this cake from BBC.


There are three parts to this cake: The cake, the curd and the icing. 

The cake:
The zest of one lemon
1 tablespoon lemon juice
1 1/2 cup self raising flour
1 teaspoon baking powder
170g butter
1 cup sugar
3 eggs

To make the cake, mix every thing together in a bowl until smooth and creamy. The divide the batter between two 8-inch pans and bake for about 35 minutes. Like any cake, it's always better to check if the center feel springy when touched. I actually baked mine for a little less than 35 minutes.


The curd:
While waiting for the cake, I decided to start on the curd. The instructions were easy enough to follow, but I still had one problem: I've never had lemon curd before. Which meant that I had no idea how thick was thick enough, and I had totally forgotten to watch videos to figure out how thick was thick enough. Thankfully, it still came out pretty well.

1 lemon, juice and zest
1/2 cup sugar
2 eggs
60g unsalted butter (Ok, the recipe actually says 2oz which is 56g, but I figured, what harm could 4g more do?)

Place lemon zest and sugar in a bowl. Whisk together the eggs and the lemon juice, and pour over the sugar and zest. Whisk everything together. Cut the butter into little pieces and add to the mixture. Place the bowl over a barely simmering pot of water. If you have a double boiler, you can use that. Stir frequently until thick. 

I was afraid that the curd would curdle on me, but it didn't and I was actually able to leave it on the stove for a few short minutes to check on other things. I think the key to this is just keeping an eye on it and whisking very frequently. I heard that it does curdle, you can simply take it off the heat and whisk until the lumps disappear, then just strain the curd when you're done.


The icing:
This is where I hit a little stumbling block. See, I had decided earlier that I didn't need to buy more confectioner's sugar, mostly because I had decided not to reduce the sugar in this recipe for my dad. Hey, it's my birthday after all. As a compromise, and also so I wouldn't have to keep thinking about his sugar levels, I decided not to make a lot of icing. The recipe calls for:

zest of one lemon
1/2 cup icing or confectioner's sugar
2-3 teaspoon lemon juice

Mix everything together until you get a soft runny consistency. Let it stand for about 5 minutes before using it. 

Since I didn't make enough icing, my cake ended up having a sugary glaze instead of the delicious white icing you see on the BBC website. Oh well. You can also decorate your cake with lemon slices. To add a touch of color, I added strawberries on top. 


22 October 2011

Of Birthday Lunches


Today was my birthday. Yey! The perfect way to spend a birthday is always good food and people you love. That's exactly how I spent my day. To celebrate this day with you, I'd like to share this really great restaurant we found at the souq here in Qatar. If you're ever in Qatar, you know maybe in 2022, you should really stop by here, especially if you love seafood like me.

The food here is great. You get a choice of a la carte, buffet or a semi-fish market where you get to chose the seafood of your choice as well as the method of cooking. This is what I did at it was amazing! Oh and nothing beats the ambiance!


The restaurant was at the lower level of the hotel


I love how they added little ocean details everywhere, even the back of this chair.


Talk about an interesting candle holder.


Grouper (or as the Arabs call it, Hammour, or Lapu-lapu in Filipino) in mustard sauce. You also get shrimps and cuttlefish  in there.

The detail, up close


Yeah, that's right, that fish still has it's head and is staring at you.


Chinese fried rice


A traditional Filipino dish call Sinigang na hipon or shrimp in sour soup. For a soup, it's light and refreshing.


My favorite drink: Lemon Mint. Best margarita alternative ever. 

The entrance to the hotel and restaurant. I love Arabic design. They also have Morrocan coffee and Arabic tea under that canopy.


19 October 2011

Of Filipino Junk Food

There are only a few snacks that make me giddy like kid and Filipino snacks are one of them. I adore Filipino junk food. They're just nothing like the ordinary potato chip and candy. They also don't get enough love on the internet. You get tons of recipes for many kakanin (rice cakes), but no one ever describes the junk foods. Poor junk food. Here's a few of my favorites:
Hopia, Banana Chips and Chichacorn 

Let's start with the salty snack. Chichacorn (or kornik, as I like to call it) is essentially Filipino pop corn. I'm quite sure that it was named after chicharon, which is deep fried crunchy pork rinds. Notice how they replaced the "-ron" part with a "-corn". It's deep fried corn kernels that is very crunchy with just enough of a salty kick. Traditionally, it's default "plain" flavor is a nice garlic flavor, but this modern twist that I have had a very mild barbecue flavor. I personally prefer the "plain" garlic flavor, but this barbecue chichacorn is actually not so bad. Chichacorn is probably as bad for my sodium levels as potato chips, but I still love them. Hey, it's not like I have them everyday, right?


Our next junk food are banana chips. Sweet and crunchy, it's absolutely perfect for the sweet toothed. They're banana that have been dessicated and fried in coconut oil with sugar. The sugar forms a perfect caramel around the banana. Yummy!


Finally, we have Hopia, which is a little snack that came to the Philippines from China. It's a little cake-like thingy with a flaky outer layer with a sweet or savory center. I have the monggo (mung beans) flavored one, so it was quite sweet. I love it. I also love the ube (purple yam) flavored ones, but I definitely don't like the savory ones like the pork flavored ones. Oh reader, I wish you could have some.


There are so many other junk foods that are just unique to the Philippines. Many of them don't get the attention they deserve. If you ever find yourself in the Philippines, try to have taste of them. Give them the love the they don't get on the interwebs.


18 October 2011

Of Tortang Talong and Lemon Pepper Fish


When I started writing this entry, I realized that I should probably look up the definition of torta. I figured that since this was a Filipino recipe, there must be an interesting history to this dish. I figured that it must have started in Spain. A quick look in Wikipedia proved me right, but it also showed me that there were so many definitions referring to torta. In Mexico, it's a sandwich, and a flat bread in Spain. Depending on where you are in the Philippines, it can either be omelette or a sweet cupcake-like thingy. (I couldn't think of another word to describe Tortang Cebuana


One of my absolute favorite versions of the word torta is tortang talong. Tortang talong is essentially an eggplant omelette. The best thing about it is the smoky smell of the eggplant as you grill it.

Here's what you need:
1 eggplant
1 egg, beaten
salt
pepper

Grill the eggplant until its skin start to char and break apart. Then remove the skin. You don't even need to exert effort in this step since the skin almost literally pulls away from the eggplant. Then using a fork, flatten the eggplant. Then it's dipping time. Dip the eggplant into the eggs and fry! Season with salt and pepper. When one side is done, flip! When the omelette looks cooked, remove it from the pan and eat!

Tortang Talong

Notice that the recipe only makes one torta. So, you'll have to make more if you're serving other people...or if you just want to eat a lot. Don't forget, tortang talong tastes really good with ketchup. It just does, at least for me. Also, there are a few variations you can do with tortang talong. Here they are:

1. You can add peas and carrots. Add them once you put the eggplants in the pan for frying.
2. You can sauté onions and garlic, then place the eggplant over a little mound of them and continue frying. (This is actually what I did)
3. Some people put meat in as well.

Of course, I couldn't just eat torta alone (although, of course, you can). So, I decided that a little fried fish should go with it. This recipe is sooo simple, and sooo good. 

For the Lemon Pepper Fish, you'll need:
1 white fish fillet
Juice of 1 lemon
pepper
salt

First thing to do is assess whether or not one fish fillet is too big or too small. My fish fillet was quite big, so I sliced it into two pieces. You don't have to do this is your fillet is too small or if you like big pieces. Then I marinated the fillets in half the lemon juice for about 5-7minutes. Then I seasoned the fish with salt and lots of pepper. Remember to at least put enough pepper such that you can actually taste the pepper. You can use either finely grounded pepper or roughly grounded.  Finally, pan fry until golden brown on both sides.


Lemon Pepper Fish


Serve both dishes with rice. You might want to try a different sauce for the fish, though. I suggest a mixture of soy sauce and lemon, or better yet, calamansi (or calamondin).


16 October 2011

Of Strawberry Banana Pancakes


My dad's been bugging me about using the last overripe banana, but I didn't want to make banana bread. Besides, there was only one ripe banana. That's when it came to me. Why not make banana pancakes? I googled a recipe for the pancakes and I found one that had strawberries too. Perfect! I had some strawberries that needed eating too. Unfortunately that recipe called for buttermilk and my family never keeps buttermilk around. (The only thing I use it for are pancakes, and we don't make them that often) The solution: make my own recipe. Ok, I didn't make it up from scratch. I'm not that good. I used an old recipe my mom uses for pancakes and adapted it. Here's my adaptation of it:

Look how nice and golden brown it is!


1 cup flour
1 table spoon sugar
2 teaspoon baking powder
1/2 teaspoon salt
1/2 teaspoon cinnamon
1 very ripe banana, mashed
1/2 cup milk
1 egg
1/4 cup canola oil
As much strawberries as you want, chopped
maple syrup
butter

Mix the flour, sugar, baking powder, salt and cinnamon in a large bowl. In another bowl, mix the banana, milk, egg and canola oil. Add the wet ingredients to the dry ones and stir until the they just combine. Don't over stir. At this point you can either fold the strawberries in or wait until the batter's on the pan and then sprinkle the strawberries onto the batter. I did the first method, but I have to say that the second would give you more control on how much strawberries you get per pancake as well as distribute them evenly. The final step is to simple fry the pancakes in a pan with some butter. (If you're like my parents who are watching their hearts, you can use canola oil instead) Remember to flip only when little bubble appear on the batter. All that's left now is to drizzle as much maple syrup as possible and eat!


15 October 2011

Of Comfort Food

My last post was about my favorite comfort breakfast food, and that got me thinking. What food would you have on days when you just want to eat something easy and delicious? Today was one of those days for me. My go to snack on days like this is buttered corn. I love how the corn seems to pop in your mouth as you bite in before it oozes its sweet juices on your tongue. Then there's that buttery taste that coats everything. And all that is so easy to make. I simply pop some frozen corn on the microwave for a few minutes until it heats up. Then I pop a pat of butter on top and let it ooze all over the corn. 


The only thing that could possibly beat this is the deliciousness of McVitie's Digestive biscuits. Yum!!! I missed these digestive biscuits. I don't think they ever sold these in the Philippines or in the USA. At least not in the usual groceries I went to. I've always felt like digestive biscuits remind me of Britain. I think it's because I remember reading about it in "A Room With A View". 

My next favorite snack is Nutella. Best eaten with bread, but there's absolutely nothing wrong with just eating it off the spoon. That's all I can say about it.

To finish everything off, a nice cup of Earl Grey tea is absolutely wonderful. I love the smell of bergamot when it mixes with black tea. I usually enjoy my tea with milk and sugar. Actually that's how I usually enjoy my tea, doesn't matter if it's black or green or white. I also like green tea with mint, but it definitely does not beat Earl Grey's with milk and sugar. 

So what do you think? What's your favorite comfort food?


14 October 2011

Of Lemon Bars


I've been thinking about making Lemon Bars for some time now. There's something about the sweetness and the tang of lemon that just makes lemon squares inviting. Not mention it's yellowness just exudes happiness. So, there was only one thing to do: hop on to the store, grab some lemons and start baking. The recipe I used was from the trusty joyofbaking website. Her recipes have yet to fail me. 

I started by making the crust, which consisted of:
1/2 cup of butter
1/4 cup icing or confectioner's sugar (although, I used even less because of the next few ingredients)
1 cup all purpose flour
1/8 teaspoon salt

I first beat the sugar and the butter until it became smooth and creamy before slowly adding in the flour and salt. Once all the ingredients just comes together, I placed it a prepared square pan (20cm x 20cm) and using my fingers, I pressed it into the bottom of the pan. Then I baked it in a 350F or 177C oven (I actually rounded it off to 180C) until it was light brown on the edges. That took approximately 18 to 20 minutes. Don't forget to remove it and cool it.

I started on the filling after the crust was was done and had cooled a little. This is where the magic happens.
1 cup granulated sugar (Yes, 1 cup. I had to resist decreasing it)
2 large eggs
the juice of 2 large lemons
1 tablespoon of lemon zest (I just used the zest of the 2 lemons)
2 tablespoons of flour

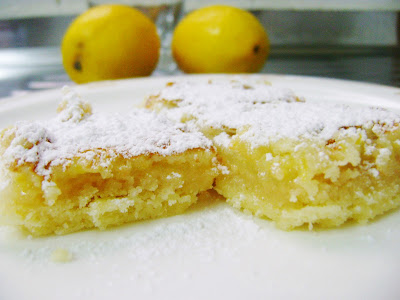
I beat the sugar and the eggs until the mixture was smooth. To tell, I dipped the tip of my (clean) finger into the mixture, and rubbed the mixture on my finger with my thumb. If there's still some graininess to it, keep beating. Once it's smooth, add the lemon juice and the zest. Beat until combined. Finally, fold in the flour. Pour the filling over the crust and bake it in the same 180C/350F oven for 17-20minutes or until the filling doesn't wiggle so much when you shake the pan. Let it cool before digging in. You can cut then sprinkle icing sugar over it, or sprinkle before cutting, or (and I think this is the best) just cut and eat!

Next time, I think next time I'll try decreasing the granulated sugar. I wonder if it will change the consistency of the filling...hmm...

The only other thing I can say about this recipe is that it is so delicious. My pictures don't do it justice at all. The crust is nice and flaky. The filling is sweet and tangy, yet the crust is able to pull back the sweetness of the filling so you don't feel like you're eating a candy. So good. Try it!


12 October 2011

Of Banana Bread Scones


I love how soft the scone is.
I came about the next scone recipe because I was looking for another way to make scones. If you're on a diet and are watching the fat and sugar content of your food, this is the recipe for you. It's also great for those annoying overripe bananas. Yes, I find them annoying. It's called Banana Bread Scone and I found it on thekitchn.

This recipe isn't like any scone recipe I've come across before. First, the dough is quite wet. Second, part of the recipe required you to freeze the dough for about thirty minutes. That said, it smelled so good and it had the right amount of sugar in it. After cutting it, I realized that it was literally a cross between a scone and a banana bread. It was soft, but it wasn't as gooey and wet as a banana bread.

2 very ripe bananas (The ones I used were so ripe, they were practically falling apart when I peeled them)
3 tablespoons milk (the recipe said 2-4 tablespoons until it made 1 cup, but my bananas were so soggy, I had to forego the measuring part and just dumped them in a bowl with the milk)
1/2 cup plain cream (or yogurt)
2 1/2 cup all purpose flour
4 tablespoons granulated sugar
2 teaspoons baking powder
1/2 teaspoon salt
1 teaspoon cinnamon powder
4 tablespoons unsalted butter
1/2 cup walnuts (optional)

I mashed the bananas and added the milk in a bowl. Then I stirred in the cream. 
In a larger bowl, I combined the flour, sugar, baking powder, salt and cinnamon. I cut in the butter until I had a coarse crumb mixture. If you're using walnuts, this would be the time to incorporate them. 
Since I wasn't using them, I went on to the next step, which was pouring in the banana-cream mixture. I stirred until the flour was just incorporated. Then I lined a plate with parchment paper and poured my dough over it, shaping it into a disk. I covered it with another sheet of parchment paper and placed it in the freezer for 30 minutes.
I preheated the oven to 400F or 200C. Then I removed the dough from the freezer and removed the first parchment paper. I inverted it into a parchment lined baking sheet and removed the second parchment paper. 
At this point, you can lice them into wedges (pull them apart a bit you plan to do so to give them room to expand) or bake it as is and slice it later. I chose to do the latter since our freezer wasn't able to harden the dough by much. Then I baked it for 25-30 minutes or until the edges had turned golden brown.
After mine came out of the oven, I cooled it for a bit before slicing it into triangles. 

In the recipe for thekitchn, they used a glaze to decorate the scone. Since I was cooking for my parents (who are starting to get old people problems), I decided to forego this part and just serve it plain with some fruit

The banana bread scone as it came out of the oven


Cutting more slices